
My first forray into the old ways went waaay back to the beginning. Bread. It’s basic, it’s humble and it’s tasty. People have been making bread forever. But making bread is pretty intimidating, especially to those of us who can’t spend all day in the kitchen watching dough rise. But there are some good reasons why you should make your own.
1: Wonder Bread. The name says it all. What the heck IS it? Have you ever read the ingredients on a package? It’s scary. And if you’ve ever seen it mold you’re probably the same person who leaves a twinkie out to see if it will ever go bad.
2. “Fresh” Bakery Bread: Who made it? Did they wash their hands after they went to the bathroom? Did they use eight different preservatives? Did they use organic ingredients?
3. Restaurant bread: Ever notice how much better bread tastes when you get it at a nice restaurant? If the bakery’s bread is fresh how come it never tastes like THAT? Wouldn’t you rather have the restaurant-yummy bread?
4. It’s fun to make your own, and it really impresses people!
So my first stop was an email to my mom begging for her bread recipe. I remember eating tons of the stuff when I was kid – there was nothing better than mom’s fresh hot bread with butter. Mmmmm. She sent me the recipe, and here’s how it went:
This is a basic white bread that uses a starter. What the heck is a starter? Well, it’s a mass of yeast, bread and flour that grows on its own and you use a bit of it each time you make bread. You don’t throw it out (unless it goes bad, of course) and you feed it whenever you use it (or once a week if you make bread less than once a week).
Starter recipe:
3 cups of bread flour
1 pkg yeast or 1 tablespoon yeast
2 cups warm water
Mix all ingredients in a glass or plastic bowl, blend well and let it sit at room temperature for at least 24 hours. Now, don’t do what I did and put it in a bowl about the size of the sum of ingredients. No, this puppy is going to grow. Before I knew it my starter had doubled in size and was coming out over the sides of bowl, growing and expanding like frankenstarter. I was afraid I was going to have to move it into the bathtub if it got any bigger. (Ok, it wasn’t that big but you get the picture.) All that to say, put it in a big bowl and cover it with a piece of plastic wrap sprayed with cooking spray. (Not a towel, unless you’re looking to have to throw it away – this is sticky stuff.) Also, don’t worry about that sour smell coming from the starter – it’s supposed to smell that way. Horray for yeast!
A note on yeast: I went to the store and panicked because they had two kinds – active dry yeast and quick-rising yeast. Mom didn’t specify. I used the quick-rising and it worked just fine. I now have some regular active dry and will post a note if it made any difference.
So once you’ve got your starter going and it’s all huge and happy, you can make your bread. (Don’t forget – the starter must be left alone for at least 24 hours, so plan in advance.)
To make the bread:
1 1/2 cups of your starter
2 cups bread flour
2 tablespoons (2 packets) yeast
1 tablespoon salt
1 big tablespoon honey
1 cup warm water
Combine all ingredients in your mixer (gotta love Kitchen Aide) and use the dough hook attachment. Beat until mixed well and then slowly add another cup flour. Don’t add it too fast or you’ll be making paste in your hair trying to rinse it out. Mix everything until the dough holds together and climbs up the hook. Now put it out on a floured board and slowly add more flour – Mom’s recipe called for another cup of flour but I could only get mine to take about a half cup and it turned out just fine. Knead your dough for 6 to 8 minutes until it feels spongy and not sticky. Cover it with plastic wrap sprayed with cooking spray and let it rise for one hour.
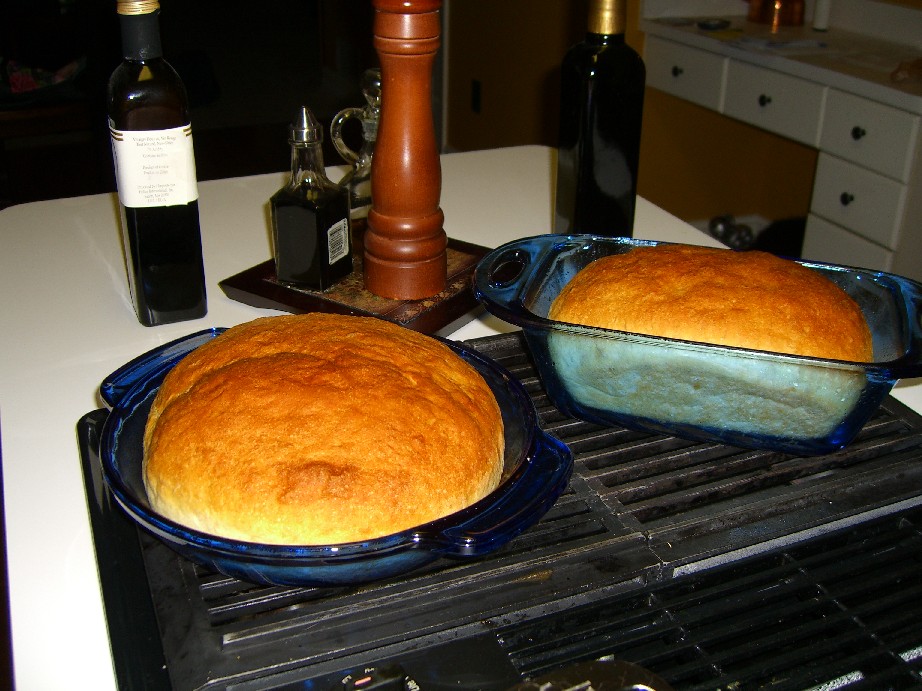
After the dough has risen, punch it down like you mean it and divide in half. Roll each half into loaf shape (I did one traditional style loaf and one round loaf in a pie pan). Put both dough balls into sprayed glass bread pans, brush tops with melted butter and let rise about an hour. Bake at 375 for 30 minutes.
When it’s done cooking it will be brown on top and will feel hard. Don’t worry, it will soften up. Take the bread out of the pans so the sides don’t get soggy and let them cool. Cut a piece of the warm bread and enjoy right away, then wrap up the bread in plastic wrap. I plan on getting some bags to use for this because the plastic wrap can be a pain to open and close when you want to cut some of the bread.
I think this stuff is fantastic toasted with a little butter and honey.
Now, don’t forget about your starter. You used some of it so to the rest of the starter add 2 cups bred flour and 1 cup warm water – mix and refergerate. Whenever you use it, replace what you use. If you aren’t using it, you must feed it two cups of flour and one cup of warm water each week, otherwise the yeast will starve and you’ll have dead starter, you murderer.
I’ve done this twice now and the bread turned out well both times. The thing I discovered is that it really doesn’t take all that much time. The only labor intensive part is combining and kneading, which didn’t take me much more than half an hour including clean up time. Plus I found that I really enjoyed the kneading process. It gives you time to think, if you’re frustrated you can take it out on the dough. If you’re tired it can invigorate you. It’s got to burn some calories, too, as a little bonus.
When it’s all said and done, you have your own delicious homemade bread and quite a sense of accomplishment. Try buying that at the supermarket.

Good looking bread you have there, I suppose you know that it is called sourdough bread, really the same stuff that is sold for the big bucks in San Francisco.
Your mother and I are penpals of sorts. Don’t recall how we met but have been conversing. I am the guy she got the basic recipe from. Not a proud author or anything and am really glad to see your post on it and that you like it. Personally, I prefer my own starters. One of which is from Bozeman, Montana and is roughly 55 years old now and the other I started myself right here in Great Falls, Montana. Both are better by far than the commercial yeast, flavor wise, but both do lack the agressiveness and take longer to rise.
I am hoping she sent the other recipes also, if not then get after her to share. LOL
Like all of your blogs but decided to comment on this one. I am not much of a cook, and your writing is encouraging. Glad to see your ‘not so successful’s’ also.
Carl
Sounds like your on a roll Ms. Culinary person!! Keep some dried cranberries on hand for your next batch of scones. I use them for everything that might call for a raisen. You can get them in little boxes like raisens now too, keep’m in the car. By the way, I always use the regular ‘active’ yeast.
Mr. sourdough from montana said that was best – of course I always do what Im told !!!! 😉 !! Keep up the good work – it’s also great sunday afternoon reading! God bless \o/\o/